Is this tutorial for you?
Visual Expert can be installed in various configurations to meet your needs.
Depending on your volume of code and the size of your team, you will fall into one of the following cases:
Trial – Small Code Volume
Evaluating Visual Expert with a limited codebase.
✓ No setup needed – the wizard handles everythingStandalone – Mid-Sized Projects
Single workstation setup for analyzing mid-sized codebases.
View guideClient / Server
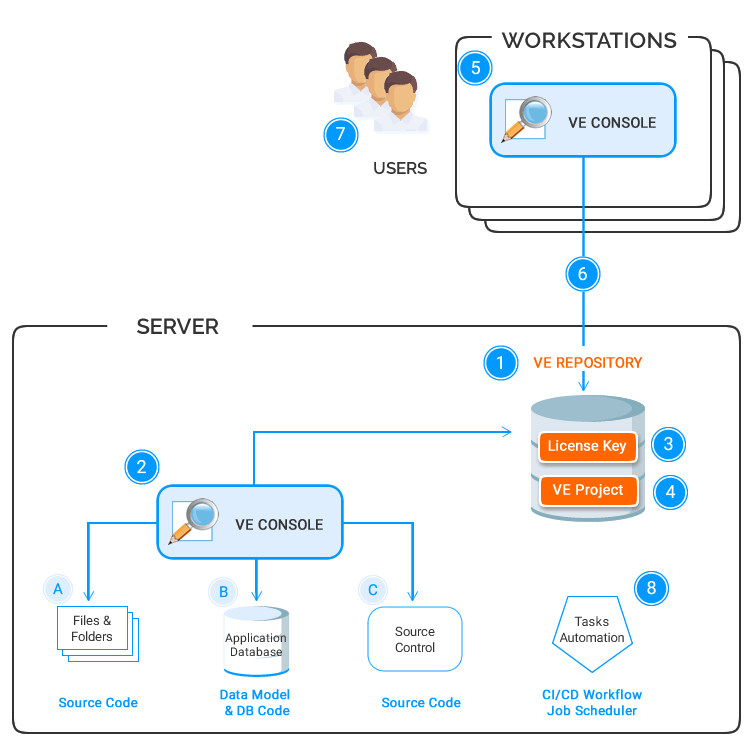
VE installed on each developer workstation, connected to a central server.
Follow this guide ↓8 Steps for Client/Server Configuration
- Install SQL Server or use an existing Instance
- Install Visual Expert on a Server
- Create a VE Repository and activate it withe a key
- Create a VE Project and Select the code to Analyze
A Select Files or folder containing code
B Extract data model and code from your DB.
C Connect to a Source Control and fetch your code. - Install Visual Expert on developer workstations.
- Connect the VE workstations instances to the Repository
- Generate a shortcut from the VE Server instance
- Use it to connect each workstation to the Repository
- Open an existing VE Project or create a new one
- Assign user permissions with respect to the roles and responsibilities of your team members.
- Automate tasks with CI/CD Servers or Command line: Code analysis, code inspection, document generation...

Step 1 – Install a new SQL Server instance, or use an existing one
This instance will host the Visual Expert Repository.
Any version of SQL Server could be used, except for Express Edition or Local DB, which do not use all the RAM and CPU available on the machine.
If you don't have a SQL Server license available, you can install SQL Server Developer Edition – free of charge – since it will be used in the context of your development activities, and not in an application production context.
Go further:
Step 2 – Install a Visual Expert copy on a server
Download and install Visual Expert from this page.
Step 3 – Create a Repository, get a License Key
After the Visual Expert installation, a wizard will guide you to:
- Connect to the SQL Server instance prepared in [Step 1].
- Create a Visual Expert Repository.
- Request a License Key.
Once generated, you will receive a notification.
Follow the instructions to download and install the key in the VE Repository.
Go further:
Step 4 – Create a Visual Expert project
This primarily consists in selecting the code & database(s) you wish to analyze.
Several options are available. You can combine them in a single project:
- Option A – You can select files and folders containing source code,
- Option B – You can connect to the application database(s), to extract and read stored procedures, functions, and a description of the data model.
- Option C – You can connect to a source control, to fetch and read source code.
Once the code selection is completed, the analysis will start. A Window will show the analysis progress, and potential warnings.
Go further:
Step 5 – Install a Visual Expert copy on each developer workstation
- Use the same installation package for workstations as for the server [Step 2].
- No need to request a key for each workstation, just connect to the Repository: you will leverage the license Key installed in [Step 3].
Step 6 – Connect the VE workstations to the VE repository
- Generate a shortcut from the VE Server instance.
This will include all the information and credentials required to access the VE Repository. - Share this shortcut with all the developers who have installed Visual Expert on their workstation.
- By clicking on it, developers directly open and connect to the VE Repository.
- Once connected to the VE Repository, they can open an existing VE Project or create a new one.
Go further:
Step 7 – Grant Access Rights to Individual Users
Grant Visual Expert permissions to your team members based on their roles and responsibilities in the project.
Once the developers have connected their VE client to the new repository, the VE project owner must review and if necessary update the permissions granted to each developer.
By default, all user permissions are set to Open the results of a code analysis and Export them in multiple formats including Excel and HTML files. The project owner can assign more permissions like Edit, Analyze and so on for specific users (as applicable according to their tasks).
Learn more about VE permissions and how to grant them.
Step 8 – Automate Recurring Tasks
It is strongly recommended to schedule the code analysis, to refresh it automatically and take into account the recent code changes. Developers will then see the latest version of the code when they use Visual Expert.
You can also automate code inspection or documentation generation. In particular, this fits well with continuous integration and continuous delivery processes.
Go further:
