
Is this tutorial for you?
Visual Expert can be installed in various configurations to meet your needs.
Depending on your volume of code and the size of your team, you will fall into one of the following cases:
Standalone - Trial -
Single user & small projects
✓ Automated setup (follow the wizard)Steps for Standalone Configuration
- Install SQL Server
- Download and install Visual Expert
- Create a VE Repository and get a Key.
- Create a VE Project to analyze your code
- Schedule tasks: Code Analysis or document generation
- Configure VE AI Services (optional)
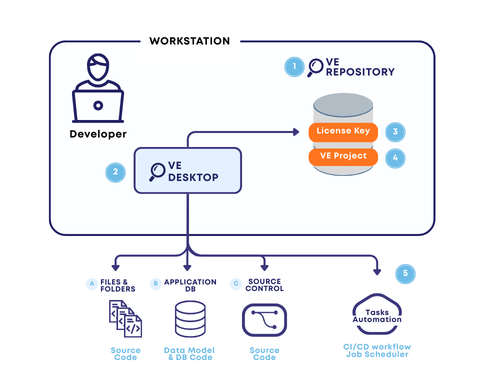
Step 1 – Install a new SQL Server instance, or use an existing one.
This instance will host the Visual Expert Repository.
Any version of SQL Server could be used, except for Express Edition or Local DB, which do not leverage all the RAM and CPU available on the machine.
If you don't have a SQL Server license available, you can install SQL Server Developer Edition.
It's free of charge since it will be used for your development activities.
For detailed instructions, refer our SQL Server Developer Edition Installation Guide
Step 2 – Download and Install a Visual Expert
- Download Visual Expert Standard Setup from the VE download page. If you haven't received a link to this page yet, please contact us.
- Install Visual Expert, using the Visual Expert Standard Setup.
- It is essential to allocate enough hardware resources, especially for analyzing large volumes of code. Please follow the system requirements, and contact us if you have any questions.
Step 3 – Create a Repository, get a License Key
After the Visual Expert installation, a wizard will guide you to:
- Connect to the SQL Server instance prepared in Step 1.
- Create a Visual Expert Repository, following this tutorial.
- Request a License Key, following this tutorial.
When your key is available, you will receive an email notification.
Follow the instructions in this email to install your key.
Step 4 – Create a Visual Expert project
This consists in selecting the code & database(s) you wish to analyze.
Several options are available. You can combine them in a single project:
Once this step is completed, the code analysis will start. A window will show the analysis progress.
Please refer to the dedicated guide:
- Oracle projects: Analyze PL/SQL Code
- SQL Server projects: Analyze T-SQL code
- All tutorials (Multi-application analysis, source control integration, and more... )
Step 5 – Automate Recurring Tasks
Schedule code analysis
We highly recommend scheduling a periodic code analysis, using the Visual Expert built-in scheduler, to ensure it reflects the latest changes to the code.
This will also save you from performing manual operations every time you want to update your code analysis.
Automate tasks before analysis
You can also automate certain preliminary actions, for example to copy your code to a location that is accessible by Visual Expert.
Step 6 (optional) – Visual Expert AI services
Configure VE AI
Visual Expert provides AI-powered features that enhance code analysis and documentation.
If you plan to use these features, additional network configuration may be required to allow secure communication between your Visual Expert server and the AI services.
- For detailed instructions, refer to the dedicated guide: Visual Expert AI – Architecture & Network configuration
AI Credits & Administrative Controls
- Visual Expert AI features consume credits tied to your licence — verify that your VE Web environment has a non-zero AI credit allocation before using these services.
- Credits can be managed at the repository/team level to control usage. Administrators can also disable AI by setting credits to zero for specific repositories.