Visual Expert Web Installation Guide via MSI
Target Architecture
Setting up the Web client is quite straightforward, starting from an existing Visual Expert client-server configuration:
The Visual Expert instance that currently parses the source code on the server side remains unchanged, with analyses stored in the same VE repository.
In essence, you will have to configure a new VE web server, running in IIS, provided with the new version of Visual Expert (2024.10 and above).
Once the VE web server is up and running, users can simply enter a URL to use the Visual Expert features in their web browser, and to access all the VE projects existing in the VE repository.

Visual Expert Web Client Architecture
If you wish, you can also keep using a desktop client that will connect directly to the repository, in addition to the web clients that connects to the web server.
Installation Guidelines
Step 1: Install Visual Expert server instance
- Before installing Visual Expert Web, ensure you have installed and configured the Visual Expert Desktop (Enterprise or Professional Edition is mandatory) executable on the server.
For detailed instructions, refer to this guide. - You can check the System Requirements for all Visual Expert editions, including Basic, Professional & Enterprise, and VE Web.
Step 2: Download and Install .NET Core Hosting Bundle
- Includes the .NET Core Runtime 6.0 and .NET Core Library.
- Download the hosting bundle (dotnet-hosting-6.0) from the official Microsoft website: Hosting Bundle.
Step 3: Download the ASP.NET Core Module
- Required for hosting ASP.NET Core applications on IIS.
- Download from the official Microsoft website: ASP.NET Core Module.
Step 4: Download and Install .NET 6.0 Desktop Runtime
- Install the .NET 6.0 Desktop Runtime.
- Download from the official Microsoft website: Desktop Runtime.
Step 5: Install Internet Information Services (IIS)
IIS is a web server software package designed for Windows. It’s used for hosting websites and other content on the web. You can install it through the “Turn Windows features on or off” menu in the Control Panel. The below screenshot shows which functions should be checked and vice versa.
- Go to the Control panel → Programs & Features → Add roles & features.
- For Windows 10 and 11, click on Turn Windows features On or Off → follow the instructions and check in the required features.

Step 6: Create an Application Pool and Site
- Application Pool → Right-click on Application Pool → Add Application Pool → Enter Name → Set the .NET CLR version to No Managed Code → click [Ok].

- Navigate to Application Pools → Select your Application → Open Advanced Settings → Locate the Process Model section → Ensure Load User Profile is set to [True].

Additional Settings for Windows Authentication Mode (only if connecting to VE repository with Windows Authentication)
- Under Process Model → Identity, click the three dot menu.

- Select Custom account → click [Set].
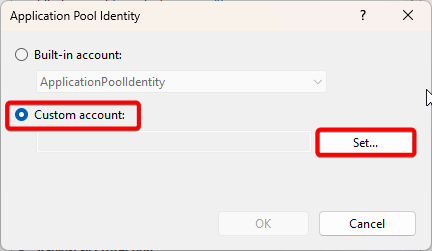
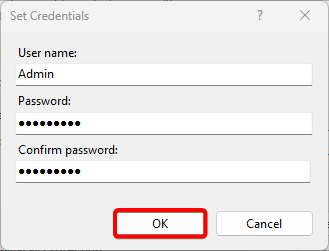
- Enter your credentials → click [OK].
- Once set, click [OK] again.
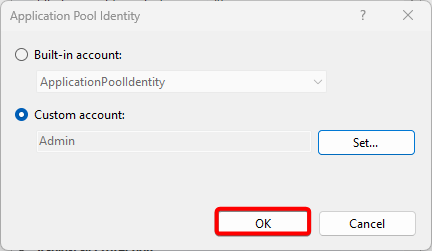
- Verify the Identity has been updated to the username you entered → click [OK].
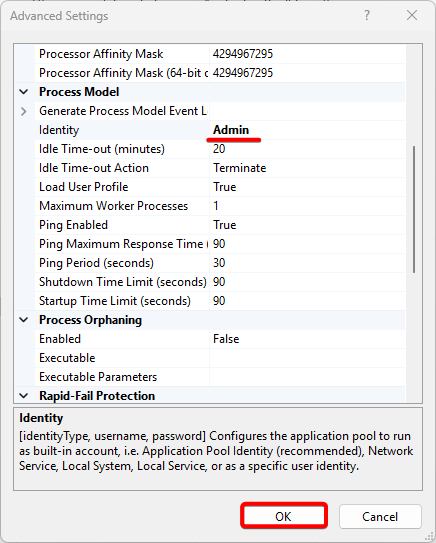
- You can confirm this change in the Application Pools dashboard, where the Identity column will display the updated username.

- Right-click on Sites → Enter Site name → Select the Application Pool you created → Specify the physical path (preferably C:\inetpub\wwwroot\[name of the folder you have created]) → Adjust the port number if necessary → click [Ok].

Step 7: Enable Windows Authentication
- Select the Site → Under the IIS section → Open Authentication → Enable Windows Authentication.


Step 8: Restart IIS
- Restart IIS to ensure the changes take effect.
- Open a command prompt as an administrator.
- Run the command
iisreset. - Confirm the restart upon receiving a confirmation message.

Step 9: Verify the Installation
- Open a command prompt.
- Run the command:
dotnet --list-runtimes. - Check the displayed versions to confirm that the .NET SDK and ASP.NET Core Runtime are correctly installed.
Step 10: Install Visual Expert Web
- Once IIS, .NET Core SDK, and ASP.NET Core Runtime are installed, proceed with the Visual Expert WebConsole installation following the provided instructions.
Visual Expert Web Installation Steps
The Visual Expert Web needs to be installed on your server. Follow these steps to install the Visual Expert Web:
- Run the setup as administrator from the command prompt.

- Follow the setup wizard. Click [Next] to start the installation.

- Accept the license agreement and proceed.

- Customize site settings as per your configuration and click [Next].

- Confirm the installation settings and click [Next].

- Wait for the installation to complete.

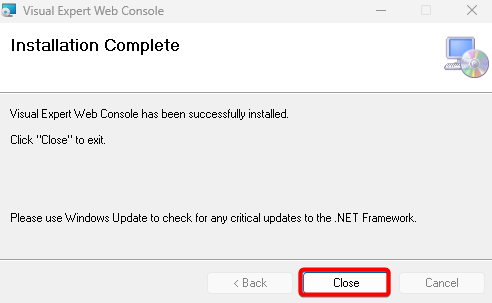
- Once installation is finished, you will see a success message. Click [Close] to exit the installer.
Learn more about Visual Expert Web features for remote code analysis, collaboration, project management, team efficiency and security.